Paint Chips and Reno Risks
Paint Chips from old peeling paint can potentially expose your family and pets to lead, which is a risk to long term health.
While lead may have been banned, it is still present in many buildings.
So how do you know if the paint on your home contains lead?
Unfortunately, you can’t tell by looking as there are no obvious signs that paint may contain lead.
However, I would say that in most cases, it probably does, to varying levels.
The best guide would be that if your home was constructed and/or painted prior to 1997, it is highly likely to contain “lead paint.”
In 1997, in Australia, the lead content of domestic paint was reduced to 0.1% lead (= 1000 ppm lead), prior to that it was much higher.
On 1st October 2021, lead paint was banned in Australia. This means that all domestic paints contain lead that is limited to 0.009% = 90 ppm – ultimately meaning that no lead can be added.
The great news is that manufacturers were informed about this back in 2010, so you can rest assured that any paint made in Australia on and after this date has no added lead.
While leaded paint is safely encapsulated by more recent coats of paint, it doesn’t pose a risk in normal daily life.
However, if you are planning to renovate your home, you could be biting off more than you intended.
The only way to know for sure is to test it.
Spot tests from the hardware store are pretty unreliable.
Laboratory analysis is always the best way to go*.
Otherwise, you could assume that the paint contains lead, and manage it accordingly.
The Dos and Don’ts of Leaded Paint
If the paint in the area you are wanting to paint is in good condition, then you can:
- Wash the walls with sugar soap
- Allow them to fully dry
- Paint them carefully
However, if you are planning to remove the paint – STOP! Read this first.
Don’t dry sand.
Sanding will cause the lead to be released as airborne particles.
If you need to sand, then wet sanding is your go to method.
Don’t use a hot heat gun.
The heat gun will cause lead vapour to be released.
The only way around this is to use a heat gun with a temperature setting, and use it on the lowest setting. Keep the heat gun away from the wall. Everyone present needs to be fitted with a P2 respirator to prevent inhalation.
Avoid chemical stripping.
Chemical stripping can cause lead to end up in the wood. The end results of this is that because no paint is visible, anyone would assume that it is safe to sand. But this is not the case.
MUST DOs
In all instances, I strongly recommend the use of PPE – a respirator is essential.
P1 for sanding. P2 for using with a heat gun.
I also recommend using an air purifier to capture fumes and dust.
Before you remove leaded paint, carefully lay down a drop sheet (taping down the edges) to ensure that you’ll collect all the lead chips.
Ensure that you carefully collect all leaded paint chips, emptying them into a bag and sealing it well.
Clean the area and surrounds thoroughly to ensure that there are no paint chips or dust around from the renovation.
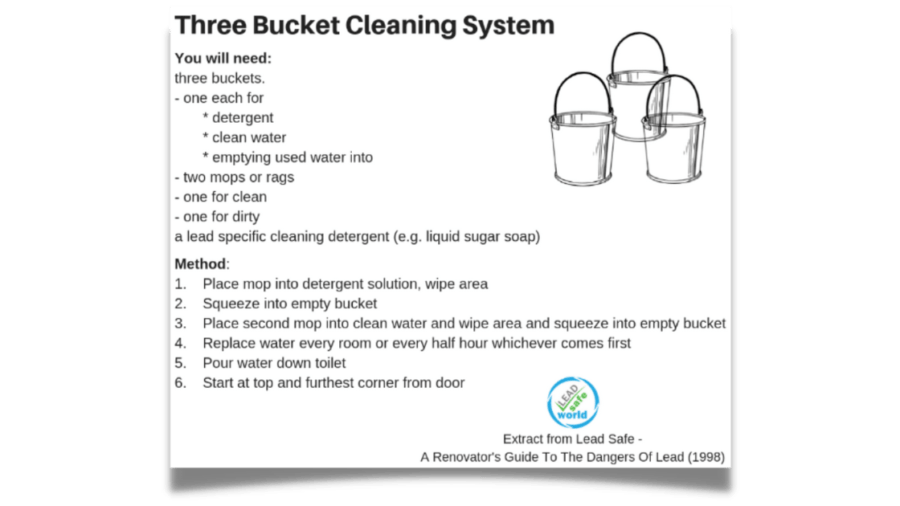
The LEAD Group recommends the 3-Bucket Method for cleaning. (Note, I am not a fan of step 5 – please choose an alternative way to dispose of the contaminated water.)
The Risks of Leaded Paint Chips and Dust
I recently tested a home that had been renovated, and there were paint chips all over the garden.
Whilst the paint chips definitely posed a problem to the occupants and their pets, the dust in their home also contained levels of lead that were high enough that by US EPA standards deemed the house uninhabitable for a child.
So follow the steps above and keep safe from lead.
Other Potential Sources of Lead When Renovating
We’ve talked about paint chips and dust in the home.
However, there are other potential sources of lead that you can be exposed to when renovating.
The two bigs ones are:
- Ceiling Dust
- Carpets
Ceiling Dust
Ceiling dust is usually full of all sorts of contaminants – lead dust being one of them. Dust can contain lead even in new buildings, particularly when near busy roads or industrial areas.
Like when sanding, dust from the ceiling can easily be inhaled or ingested.
And as such, I always recommend having ceiling dust professionally removed prior to any renovations.
The Australian Dust Removalists Association (ADRA) is your go to place for experts in safe dust removal.
Carpets
Carpets store a lot of dust and other matter – we won’t go into the details here, just know it’s like a time capsule of your home.
Pulling up carpets and underlay can expose you to a lot of this matter, so care needs to be taken.
Simply spray carpets with water, cut them into strips and roll them up. Taking it a step further, it is advised that you then wrap these carpet rolls in plastic and carefully remove them. This last step prevents contamination of other areas of the building from both lead and mould spores.
The same can be done with the underlay.
I then recommend a good clean, following the Three Bucket Method, as well.
Other Reno Tips
Make sure you clean up well – take extra care to remove dust, paint chips and other debris.
Test the soil if you’re planning to have a vegetable garden or chooks, you have pets, you’ve got children (especially if they’re prone to pica – eating things that aren’t normally considered food).
Take care to choose taps and tapware that are lead-free.
Interested in Learning More?
Check out this post and details about how to join lead expert, Elizabeth O’Brien (The LEAD Group) for a live Q&A call during International Lead Poisoning Prevention Week of Action (ILPPWA). Don’t worry if you’ve missed the event – go there anyway as I’ll post the video of the call there for you. 🙂
*I’m doing onsite assessments for lead, so if you want my help, enquire here.
Bamboo Soap Dish
What I Love About Bamboo Soap Dish
The Bamboo Soap Dish is a perfect way to care for your beautiful hand-made soaps.
Allowing your soap to drain means it is kept dry.
This will prolong the life of your soap, and help it to last longer.
Often, the soaps of choice (hand-made, un-dyed and fragrance-free) are more expensive than the mass-produced chemical-laden supermarket soaps. So, keeping them going for longer is not only good for the planet, but also for our hip pocket.
Wet soap “dissolves” faster, meaning that you use more than if the bar of soap were dry.
Also, I’ve noticed that wet bars of soap with bubbles on them seem to disappear more quickly, too. This is the reason that I always give my bar of soap a quick rinse before popping in on the dish to dry out.
As well, I love keeping things dry – as I always say, “mould is a moisture issue.” So if there’s any pointers or products I can stock to help you minimise mould, then I’ll be sharing them with you.
These soap dishes are made from bamboo – which is naturally antimicrobial. That said, aim to keep your dish as dry as possible. So ensure that the water that runs off your soap can get around the base of the dish and down the drain.
I love these soap dishes for camping trips, too. They are lightweight and simple to use.
What Is In It?
Bamboo Soap Dish is made of 100% bamboo.
Dimensions:
- 11.5 x 8.5 x 1.6 cm
How to Use Your Bamboo Soap Dish
Simply place it where it can easily drain and pop your bar of soap on top.
As part of my household cleaning, I often give mine a scrub to keep it in good condition.
Bamboo Cloths – Microfibre
Bamboo Cloths Microfibre – Why I Love Them
These Large Bamboo Cloths are microfibre cloths – which means that they are designed to pick up dust and dirt… Instead of smearing them around.
As a result, you can clean just with water – no need to add any chemicals.
Which is another plus for the environment.
These cloths differ from the others we have in store (see here) in the following ways:
- They are larger
- The 2-layers are woven together
- The weave is loose, which means that they dry quickly
This last point is important. The quicker they dry, the better.
In humid parts of the country, things can take days to dry – which increases the risk of mould and other microorganisms. I wanted to make sure that everyone all over our beautiful country had the opportunity to use Bamboo Microfibre Cloths – and to help care for our big home (our planet).
The loose weave is also a plus in terms of cleaning. The texture can help budge food from dishes and larger particles on surfaces.
Being bamboo, and therefore they are naturally antimicrobial. An added bonus!
What is it?
Here are the specs on Bamboo Microfibre Cloths.
- Dimensions: 29cm x 29cm
- 100% bamboo
- Naturally anti-bacterial
- 2-ply
- Layers are woven together
- Loose weave
These come in a 3-pack.
NOTE: We’ve also got smaller & thicker Bamboo Microfibre Cloths. You can check them out here.
How to use Bamboo Microfibre Cloths
Large Bamboo Cloths work well with just water – cleaning products are not actually required. (Saving you money.)
WET DUSTING
You can “wet dust” by wetting and squeezing your cloth out well. Wipe the surface, and then follow up with a dry cloth.
CLEANING
- Use a dry Large Bamboo Cloth to sop up a spill – you will witness its superpowers at soaking things up
- General cleaning can be done using a dry cloth and a “mister” – simply spraying some water on the surface to be cleaned before wiping it over with the cloth
- Mix up warm water with a few drops of essential oils, and use these to clean your home
- TOP TIP: keep your cloths for different areas – write on the label, or pin a coloured ribbon on it. For example, green for kitchen, blue for bathroom, pink for floors
Caring for your Microfibre Cloths
Simply wash them regularly in a warm wash.
Take care NOT to add fabric softeners as these will stop your cloth from working properly.
Do NOT tumble dry.
Drying them in the sunshine is ideal.