Moving house can be an exciting and stressful experience. Apart from packing and unpacking, there are many things to consider.
To help make your move as smooth and healthy as possible, I’ve compiled a checklist of tasks to complete at different stages before moving day.
Plan and Prepare
The first step to a successful move is planning and preparation.
It’s important to create a moving plan and decide on the moving date, book a reputable moving company, and reserve a parking space for the moving truck if necessary.
You should also take the opportunity to declutter your home by going through your belongings and donating or selling items you no longer need or want. This not only reduces the amount of items you’ll need to pack but can also help to create a healthier living environment in your new home.
It’s also important to notify your utility companies and service providers of your move and arrange for services to be discontinued and transferred to your new address.
Don’t forget to change your address with the post office, banks, insurance providers, and any other relevant parties.
Pack and Protect
The next stage is to start packing and protecting your belongings.
Gather packing supplies such as boxes, tape, and bubble wrap, and use new boxes to avoid any potential mould or fragrance issues.
Label each box with its contents and the room it belongs in to make unpacking easier.
And if you aren’t going to be there when the removalists unpack (yes, I had this happen when I moved interstate), be sure to provide a floor plan and label the boxes according to which room they need to be put in.
If anyone in your household has an allergy to house dust mites, it is important that they protect their health by wearing a mask and gloves when packing and cleaning.
Finalise and Confirm
As moving day approaches, it’s time to finalise and confirm your plans.
Double-check the date, time, and any special instructions with your moving company.
Make sure everything is packed and ready to go, and do a final clean of your old home.
Arrange for a deep clean of your new home before moving in to ensure it’s a healthy and safe living environment.
Many of my clients find it helpful to have someone wash all walls and ceilings with sugar soap to get rid of the smells of previous residents.
It’s also important to confirm your plans with family and friends and ensure everyone is aware of the moving schedule and has their own arrangements in place.
Final Preparations
Pack a box with essential items, such as toiletries, a change of clothes, and important documents, that you will need immediately upon arrival at your new home.
Confirm the arrival time of the removalist.
Make sure you have enough cash or you’re able to pay the removalist by card.
Clean your old home, making sure you haven’t left anything behind.
In addition to packing your belongings, consider packing a “survival kit” that will tide you over for the first 24 hours. This could include:
The kettle and your favourite beverages
Cups or glasses
Purified water
Food you can eat as you unpack
Basic crockery and cutlery
A frozen pre-cooked meal you can heat up for dinner
If you have pets, make sure you have their water bowl, food bowls, food, medications and beds
I always like to have music on – so back in the day, I’d have my favourite CDs + stereo
Keep your air purifier with you, as you will likely want to put that on when you arrive
Self-Care: Moving Day
Once you’re up and out of bed, wrap your mattress in a tarp and tie it so that it is well-protected while in transit.
Before leaving your old home, conduct a final walkthrough to check all rooms and storage areas to ensure nothing is left behind.
When you arrive at your new home, confirm all utilities are working, and begin unpacking and settling into your new home.
Keep your labelled boxes and important documents in a safe and accessible place.
The first 5 things to set up in your new home:
1) When I first moved out of home, Mum told me the first thing to set up was my bed. And she was right. At the end of a long and strenuous day, being able to hop in a shower then flop into bed is essential.
2) Set up your air purifier so you’ve got clear air from the get go.
3) Get your kettle and drinks set up – it’s so important to stay hydrated.
4) Make sure you get the basics of your kitchen set up – the fridge, and what you’ll need in the first 24 hours.
5) The stereo is next – or however you listen to music. I love music to keep me motivated.
Moving House is a big deal, but it can be smooth
Moving house requires careful planning and preparation, but with the above checklist, it can be a smooth and healthy experience.
By following these tips, you can ensure that your move is stress-free and that your new home is a healthy and safe living environment for you and your family.
If you’re looking for more tips on healthy living in rental properties, including how to protect your rights, health, and belongings as a tenant, be sure to check out my “Blueprint to Living in a Rental” course.
Paint Chips from old peeling paint can potentially expose your family and pets to lead, which is a risk to long term health.
While lead may have been banned, it is still present in many buildings.
So how do you know if the paint on your home contains lead?
Unfortunately, you can’t tell by looking as there are no obvious signs that paint may contain lead.
However, I would say that in most cases, it probably does, to varying levels.
The best guide would be that if your home was constructed and/or painted prior to 1997, it is highly likely to contain “lead paint.”
In 1997, in Australia, the lead content of domestic paint was reduced to 0.1% lead (= 1000 ppm lead), prior to that it was much higher.
On 1st October 2021, lead paint was banned in Australia. This means that all domestic paints contain lead that is limited to 0.009% = 90 ppm – ultimately meaning that no lead can be added.
The great news is that manufacturers were informed about this back in 2010, so you can rest assured that any paint made in Australia on and after this date has no added lead.
While leaded paint is safely encapsulated by more recent coats of paint, it doesn’t pose a risk in normal daily life.
However, if you are planning to renovate your home, you could be biting off more than you intended.
The only way to know for sure is to test it.
Spot tests from the hardware store are pretty unreliable.
Laboratory analysis is always the best way to go*.
Otherwise, you could assume that the paint contains lead, and manage it accordingly.
The Dos and Don’ts of Leaded Paint
If the paint in the area you are wanting to paint is in good condition, then you can:
Wash the walls with sugar soap
Allow them to fully dry
Paint them carefully
However, if you are planning to remove the paint – STOP! Read this first.
Don’t dry sand.
Sanding will cause the lead to be released as airborne particles.
If you need to sand, then wet sanding is your go to method.
Don’t use a hot heat gun.
The heat gun will cause lead vapour to be released.
The only way around this is to use a heat gun with a temperature setting, and use it on the lowest setting. Keep the heat gun away from the wall. Everyone present needs to be fitted with a P2 respirator to prevent inhalation.
Avoid chemical stripping.
Chemical stripping can cause lead to end up in the wood. The end results of this is that because no paint is visible, anyone would assume that it is safe to sand. But this is not the case.
MUST DOs
In all instances, I strongly recommend the use of PPE – a respirator is essential.
P1 for sanding. P2 for using with a heat gun.
I also recommend using an air purifier to capture fumes and dust.
Before you remove leaded paint, carefully lay down a drop sheet (taping down the edges) to ensure that you’ll collect all the lead chips.
Ensure that you carefully collect all leaded paint chips, emptying them into a bag and sealing it well.
Clean the area and surrounds thoroughly to ensure that there are no paint chips or dust around from the renovation.
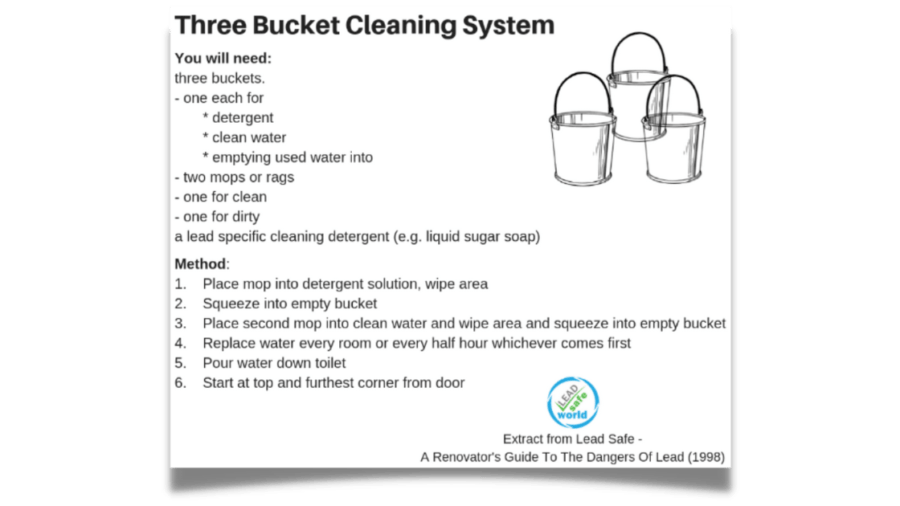
The LEAD Group recommends the 3-Bucket Method for cleaning. (Note, I am not a fan of step 5 – please choose an alternative way to dispose of the contaminated water.)
The Risks of Leaded Paint Chips and Dust
I recently tested a home that had been renovated, and there were paint chips all over the garden.
Whilst the paint chips definitely posed a problem to the occupants and their pets, the dust in their home also contained levels of lead that were high enough that by US EPA standards deemed the house uninhabitable for a child.
So follow the steps above and keep safe from lead.
Other Potential Sources of Lead When Renovating
We’ve talked about paint chips and dust in the home.
However, there are other potential sources of lead that you can be exposed to when renovating.
The two bigs ones are:
Ceiling Dust
Carpets
Ceiling Dust
Ceiling dust is usually full of all sorts of contaminants – lead dust being one of them. Dust can contain lead even in new buildings, particularly when near busy roads or industrial areas.
Like when sanding, dust from the ceiling can easily be inhaled or ingested.
And as such, I always recommend having ceiling dust professionally removed prior to any renovations.
Carpets store a lot of dust and other matter – we won’t go into the details here, just know it’s like a time capsule of your home.
Pulling up carpets and underlay can expose you to a lot of this matter, so care needs to be taken.
Simply spray carpets with water, cut them into strips and roll them up. Taking it a step further, it is advised that you then wrap these carpet rolls in plastic and carefully remove them. This last step prevents contamination of other areas of the building from both lead and mould spores.
The same can be done with the underlay.
I then recommend a good clean, following the Three Bucket Method, as well.
Other Reno Tips
Make sure you clean up well – take extra care to remove dust, paint chips and other debris.
Test the soil if you’re planning to have a vegetable garden or chooks, you have pets, you’ve got children (especially if they’re prone to pica – eating things that aren’t normally considered food).
Take care to choose taps and tapware that are lead-free.
Interested in Learning More?
Check out this post and details about how to join lead expert, Elizabeth O’Brien (The LEAD Group) for a live Q&A call during International Lead Poisoning Prevention Week of Action (ILPPWA). Don’t worry if you’ve missed the event – go there anyway as I’ll post the video of the call there for you. 🙂
*I’m doing onsite assessments for lead, so if you want my help, enquire here.
Applying a little foresight and forward planning can help to prevent renovation health hazards. Through the past decade, I have found that many of my clients have experienced health issues due to factors in their homes, I call these hidden hazards.
In order to equip you with information and strategies while renovating your home, I am going to share with you 5 of the common hazards… and give you strategies on how you can tackle them safely and effectively.
Mould
I’d say mould is a “complex beast.” Here are some key points in a nutshell:
Ultimately, mould is a moisture issue. If there’s mould, there has been moisture. Conversely, if something is wet for long enough (48 hours) you can have mould.
There are over 100,000 different types of mould, it comes in many colours and has many different moisture requirements.
It’s a myth that mould only grows in cold, dark places. Mould spores are present everywhere and can become active when there is enough moisture present.
Mould can be actively growing, yet be invisible and/or have no odour.
It’s also a myth that only mould that is black can cause problems to health.
Not everyone reacts the same way to mould. People can be allergic to it, or become sensitised over time. Others may have an immune system that can deal with it without them even realising it!
Mould can grow in all sorts of places – even in areas that you can’t see.
The biggest factor when it comes to renovation health risks is that any time you disturb mould, it releases spores. This means any changes to moisture levels, light, temperature, air movement, as well as physically disturbing it, can result in mould releasing spores.
Keep your eyes peeled for any signs of water, mould or damage: wood with “wood rot” (a.k.a. “water damage”), a “high tide mark” in the subfloor and on the stumps, brown stains (typically on ceilings and walls), paintwork that is peeling, cracked or bubbling, and swollen wood (door jambs, cabinetry, kickboards).
If you spot any of these, get in touch so I can advise on how to best manage the situation.
Asbestos
Asbestos is a material that most of us have heard of. I am sure you also know of the health risks, like mesothelioma that can result from asbestos exposure.
However, it is important to know that asbestos does not pose any health risk if it isn’t damaged or disturbed. Which means, you can live in a 1950s home and have no asbestos-related issues if you don’t make holes in the walls or renovate. This is great news – except if you do want to renovate.
Here are some facts about asbestos.
It’s strong, heat resistant and durable
It was used in a vast range of materials for many decades,
The peak usage of asbestos was 1950s-1970s,
Asbestos was banned in 2003, and
It is impossible to know if a material contains asbestos simply by looking at it.
Apart from “Hardie Boards”, cement-lined asbestos pipes and roof tiles, asbestos was used in electrical cable casing (this is the braided one), window sashes on hung windows, slagging, old laundry tubs, carpet underlays, tiles, bakelite materials and so many other materials.
If your home was built before 2003 and you are planning on a renovation, engage a licensed asbestos inspector to conduct a “demolition survey.”
Lead
Lead has also been widely used in a number of products, and was only phased out from use in paint as recently as 2010. Whilst leaded paint, like asbestos, when it isn’t disturbed poses little risk – if it is sanded or peeling, it can be particularly hazardous to health.
There are often no symptoms of lead poisoning for some years – and common long term effects of lead poisoning include loss of libido, reduced sperm count, lowered IQ, Alzheimer’s Disease, hearing loss, joint pain, stroke, and has been linked to many “diseases of ageing.”
Lead can be present in our homes in paint, solder, flashing (which can get into tank water), lead dust (from busy roads and industry) which can get into the soil or roof space, and even lead lighting.
What is important to know with lead is that the “spot tests” that you can get at hardware stores are extremely unreliable. It is for this reason that they are not something that I recommend. Instead, you can get samples analysed by an accredited laboratory.
If you suspect lead might be present then take extra care:
wear a respirator,
gloves and coveralls,
avoid dry sanding,
avoid removing paint with heat guns,
manage the dust to prevent secondary contamination, and of course,
keep pets, pregnant women, young children and the elderly away from areas being renovated.
For more information on lead, a top resource is LeadSafeWorld.
Dust
Dust is certainly something you can certainly expect in any renovation.
But is dust safe?
I always err on the side of caution, and I would say, “no.” Better safe than sorry, right?
Two places where dust pose the biggest risks are carpets and the roof space.
Any time you are doing anything involving the ceiling or roof space be sure to have the dust removed prior. This could be installing insulation to cutting out a piece to installing downlights, and so on.
For carpets, I recommend that you spray them down with water, cut them into strips, roll each strip, wrap in a tarp and take it out to the skip. This will prevent dust becoming airborne as well as reduce the risk of spreading it through other parts of your home.
And of course, personal protective equipment is always recommended!
Plan Ahead and Avoid Renovation Health Hazards
Whilst we know how easy it is to get swept up in the vision and planning… However, you are now armed with important information to protect yourself and your family from the most common renovation health hazards.
If you’d like advice on your particular situation, please book a call with me.
🟢 CLOSING DOWN SALE - 20% off storewide USE COUPON AT CHECKOUT: lastchance 🟢 Dismiss
We're Open!
We’re open throughout the festive season – only closing for public holidays.


")
")